Most presenters do this. Give a presentation, finishing with a "questions?" slide. Except, that's a really bad idea.
You give a talk at a conference? You have 20, maybe 45 minutes to get your topic into the mind of the audience? Then don't let your audience stare at "Questions?" for 10, 20 minutes (however long the question time takes). Even if there are no questions, it usually takes a few minutes for applause, saying thanks and until you leave the podium. And the whole time your audience is staring at a meaningless word.
So, skip the useless "Questions?" slide. You can invite your audience to ask questions without it too. The whole point of being a speaker is that you're allowed to also say things that are not on the slides.
Finish with a slide that reminds your audience what you just talked about. A summary of the talk, the one point you really wanted to drive home. Maybe even a joke, if you have one that gets the point across.
And your contact details. It gives those without questions enough time to write it down.
Friday, September 28, 2012


Tuesday, August 28, 2012
X.Org integration test suite
One of the problems we face in X is that testing can be incredibly painful. Somebugs only happen with a specific server state, a specific device and a specific application. Sometimes we don't spot regressions for several releases, and in some cases that means we can't easily go back and fix it either - users may have gotten used to the new behaviour already.
A few months ago, Chase Douglas announced the xorg-gtest framework. I started extending xorg-gtest and writing tests against it. Olivier Fourdan soon joined in with his own tests. The result of that are the xorg integration tests (XIT) found here:
http://cgit.freedesktop.org/~whot/xorg-integration-tests/
This post is an outline of what the XIT do and what we could potentially make it do. We currently have over 50 tests in the XIT repository. Most of the tests are still quite simple, but I've already added some that test for a specific bug and that certainly helped testing. In one case, a failing test reminded me that I forgot to send a pull request :)
googletest and xorg-gtest
xorg-gtest is based on the googletest C++ framework. It provides a bunch of classes with virtual functions that are called set up or tear down a test. For the tests, it provides a set of assertion macros. xorg-gtest provides a set of classes on top of googletest that make starting an X server simpler. The XServer class provided hooks up config and log files, waits for the server to accept connections and terminates the server gracefully. It also includes a class for starting evemu devices and re-playing input event sequences. There are a few additional helper classes in the XIT, for example one that makes writing configurations easier. They may move to xorg-gtest at some point in the future.
Example tests
Your average test now essentially consists of three steps: write out a specific config, start the server and then query that server for information or test it for behaviour.
A straightforward test is the acecad driver test below.
TEST(AcecadInputDriver, WithOptionDevice)
{
    XOrgConfig config;
    xorg::testing::XServer server;

    config.AddInputSection("acecad", "--device--",
                           "Option \"CorePointer\" \"on\"\n"
                           "Option \"Device\" \"/dev/input/event0\"\n");
    config.AddDefaultScreenWithDriver();
    StartServer("acecad-type-stylus", server, config);

    ::Display *dpy = XOpenDisplay(server.GetDisplayString().c_str());

    int ndevices;
    XIDeviceInfo *info;
    info = XIQueryDevice(dpy, XIAllDevices, &ndevices);
    XIFreeDeviceInfo(info);

    ASSERT_EQ(ndevices, 7);

    config.RemoveConfig();
    server.Terminate(3000);
    server.RemoveLogFile();
}
A slightly more involved test that makes use of the googletest class hierarchy would be the void driver test below. It makes use of a InputDriverTest class that starts the server for us and tears it down afterwards. So all we need is a couple of lines for the class definition and then the test itself.
class VoidInputDriverTest : public InputDriverTest {
public:
    /**
     * Initialize an xorg.conf with a single CorePointer void device.
     */
    virtual void SetUp() {
        InputDriverTest::SetUp("void");
    }
};

TEST_F(VoidInputDriverTest, VoidDriver)
{
    ASSERT_EQ(FindInputDeviceByName(Display(), "--device--"), 1);
}
These two are just examples as used in the integration test suite. I recommend reading the googletest documentation for a bit more info on test fixtures and assertions. xorg-gtest also is well-documented though I recommend building the doxygen sources.
Emulating input devices
xorg-gtest provides a Device class that, based on evemu recordings, can simulate input devices. So with the current implementation, this as simple as:
  SetDevice("keyboards/AT-Translated-Set-2-Keyboard.desc");
  dev->Play("keyboards/qwerty.events");
  ...
  dev->PlayOne(EV_KEY, KEY_Q, 1, true); // press
  dev->PlayOne(EV_KEY, KEY_Q, 0, true); // release
If you now check for the keysym received, you can easily write a few simple XKB layout tests.
Fighting the build system
As convenient as tests are to write, googletest is not the easiest thing to deal with. The piles of macros subclass your classes and the C++ ODR essentially prevents googletest from being built into a library. Autotools on the other hand make it difficult to compile an external project into your own file. That is the main reason for one big collection of tests instead of a per-driver test suite. Copying Makefile.am's around is painful enough, but at least manageable when only one project does it.
The current need for three different repositories (googletest, xorg-gtest and XIT) doesn't make things easier. I'm somewhat tempted to merge XIT into xorg-gtest, be it as git submodule or some other means.
Having said that, since starting to write the tests I'm also really tempted to merge the drivers into the server, it would make things a lot easier
ifdefs maze
To make the tests useful, they should be able to run on most systems. Right now, I've got some simple defines to test for RHEL6 and also XI 2.2. But I don't think this will scale too well. Every system may have different defaults, and short of having platform-specific tests (which may only be different in one single line) I don't know what the good answer is. I do want it answered soon, before it gets out of hand.
Scalability
Running all tests takes a while. In the current test design, every single test starts a new server and thus it takes a couple of seconds for even the quickest test to succeed. This works with 50 test cases, but it won't work with 500 and even less with 5000. So we need some solution for that. Not re-starting the server is the obvious one and there will be tests that won't require that.
Output testing
Most of the test runs I do either on my laptop or on a virtual machine. For input tests, this is easy since we only need to set up the dummy driver and the rest can be emulated. For output tests, not so much so a good approach of only running tests applicable for the hardware would be useful. I haven't thought too much about this yet.
Testing XIT
Right now, it sits in my personal home directory but I hope that after XDC this year, we can decide what the future of this test suite can be and where to host it proper.
In the meantime, grab it from here:
Monday, August 20, 2012
screen configuration for automatic session names
screen is an immensely useful program, but once you start running multiple sessions at the same time, it gets tricky to find the right one again. For example, which one was offlineimap again?
:: whot@salty:~> screen -ls
There are screens on:
5238.pts-3.salty (Detached)
5229.pts-3.salty (Detached)
The -S argument allows to specify a session name but I couldn't find a configuration to set this automatically. So I've added this little script:
$> cat $HOME/scripts/screen
#!/bin/bash
/usr/bin/screen $([[ ($1 != -*) && ($# > 0) ]] && echo "-S $1") "$@"
Explanation: if called with 1 or more parameters and the first parameter does not start with a dash, replace a call in the form of screen command ... with screen -S command command ...
This results in screen sessions having useful names, allowing for more effective reattaching. And the obligatory, ahem, screenshots:
:: whot@salty:~> screen -ls
There are screens on:
5238.pts-3.salty (Detached)
5229.pts-3.salty (Detached)
The -S argument allows to specify a session name but I couldn't find a configuration to set this automatically. So I've added this little script:
$> cat $HOME/scripts/screen
#!/bin/bash
/usr/bin/screen $([[ ($1 != -*) && ($# > 0) ]] && echo "-S $1") "$@"
Explanation: if called with 1 or more parameters and the first parameter does not start with a dash, replace a call in the form of screen command ... with screen -S command command ...
This results in screen sessions having useful names, allowing for more effective reattaching. And the obligatory, ahem, screenshots:
:: whot@yabbi:~> screen foo
[detached from 17755.foo]
:: whot@yabbi:~> screen bar
[detached from 17766.bar]
:: whot@yabbi:~> screen -ls
There are screens on:
    17766.bar    (Detached)
    17755.foo    (Detached)
2 Sockets in /var/run/screen/S-whot.
Wednesday, July 11, 2012
Daily tmp directory
My $HOME/tmp directory got a bit messy, especially with building test rpms or testing tarballs. My solution was to just change the directory to automatically change daily. Scripts below:
:: whot@yabbi:~> cat scripts/tmp-today
#!/bin/bash
date=`date +%Y-%m-%d-%a`

tmpdir=$HOME/tmp/$date
tmplink=$HOME/tmp/today

if [ -e "$tmpdir" ]; then
    exit 0
fi

mkdir $tmpdir
ln -sf $tmpdir $tmplink
And the crontab entries to run this script:
0 2 * * * /home/whot/scripts/tmp-today
@reboot /home/whot/scripts/tmp-today
So run the thing at 2.00 am and on every reboot in case the box was shut off overnight. I had it on midnight first, but I think 2 am is better. If I'm still up at 2 and working, then mentally I'm still in on the day before and I don't want files to end up in different directories just because midnight clocked over. And because the laptop may be suspended overnight, we run the script on resume as well:
:: whot@yabbi:~> cat /etc/pm/sleep.d/00-tmp-dir
#!/bin/bash

case "$1" in
 thaw|resume)
  su -c - whot /home/whot/scripts/tmp-today
  ;;
 *)
  ;;
esac
This obviously works for other directories as well, e.g. your daily download directory.
Friday, July 6, 2012
elographics touchscreen setup
This is a tutorial of sorts on how to set up an elographics serial touchscreen. I don't actually have such a device but the question pops up every couple of months. Together with Tom Munro Glass and Tias Guns, we got one working properly.
Edit: 18/09/2014 - add systemd description
A bit of history first: not too long ago, the X server was talking to serial devices directly and thus had several drivers for specific input devices. The elographics X drivers is one of them. Unfortunately, due to lack of hardware we, the upstream maintainers, can only perform cursory testing of that driver. The Linux kernel however supports a large amount of serial devices too, so for this tutorial I'll explain how to use the linux kernel to talk to the device. I'll show how to set up udev rules to use inputattach and then the X.Org evdev driver, thus making the device utilise a well-tested driver that has some client-stack support not found for the X.Org elographics driver [1].
Once inputattach is running, the device should be visible in /proc/bus/input/devices. You can run evtest against it and see the event stream.
If you require additional options, set up an xorg.conf.d snippet. There you can add any options found in evdev(4):
Once this file is in place, restart haldaemon and check with lshal that the right options are assigned. Then restart X and the device should work.
Good luck!
Many thanks to Tias and Tom for proof-reading this article multiple times.
[1] for example, evdev supports dynamic recalibration with the xinput_calibrator tool
[2] check the output of udevadm info --export-db
[3] your distribution should ship /usr/share/X11/xorg.conf.d/10-evdev.conf which assigns evdev to MatchIsTablet.
[edit 22 Feb 13: fix typo in MatchProduct name]
Edit: 18/09/2014 - add systemd description
A bit of history first: not too long ago, the X server was talking to serial devices directly and thus had several drivers for specific input devices. The elographics X drivers is one of them. Unfortunately, due to lack of hardware we, the upstream maintainers, can only perform cursory testing of that driver. The Linux kernel however supports a large amount of serial devices too, so for this tutorial I'll explain how to use the linux kernel to talk to the device. I'll show how to set up udev rules to use inputattach and then the X.Org evdev driver, thus making the device utilise a well-tested driver that has some client-stack support not found for the X.Org elographics driver [1].
Kernel setup
USB devices are automagically detected by the kernel and it will load the right drivers. Serial devices on the other hand require some manual configuration. Elographics devices have serial kernel drivers and inputattach can be used to hook serial devices up with those kernel drivers. First we need to load the kernel module, then call inputattach with the right options for our device:root@localhost:~> modprobe elo root@localhost:~> inputattach -elo /dev/ttyS0 --daemonThe path to the device may need to be changed on your box. Do look up the inputattach man page, depending on your device you may need a different flag.
Once inputattach is running, the device should be visible in /proc/bus/input/devices. You can run evtest against it and see the event stream.
udev setup pre systemd
Since we don't want to run inputattach manually each time, we'll now set up udev to run this command for us. According to Tom, the elographics device does not have a pnpid, so he configured it with a fixed device path on ttyS4:
$> cat /lib/udev/rules.d/99-elographics.rules
ACTION=="add|change", SUBSYSTEM=="tty|pnp", KERNEL=="ttyS4", \
        RUN+="/sbin/modprobe elo", \
        RUN+="/sbin/inputattach -elo /dev/%k --daemon"
If a device has a pnpid, the rule can be more flexible in what ttyS* the device needs to appear on. For example, a Wacom serial tablet may have the id WACf004 so we can use the match rule below.
$> cat /lib/udev/rules.d/99-wacom-w8001.rules
ACTION=="add|change", SUBSYSTEM=="tty|pnp", KERNEL=="ttyS[0-9]*", \
        ATTRS{id}=="WACf*", \
        RUN+="/sbin/modprobe wacom_w8001", \
        RUN+="/sbin/inputattach -w8001 /dev/%k --daemon"
Once this rule is in place, inputattach will be started for us at boot time (of course the device needs to be connected at boot time too). The next step is to configure X to see the device.
udev setup with systemd
Newer udev (for some value of new, we're talking about Fedora 18 or so) won't let RUN start long-running processes, such processes get killed off. If you are on system with systemd you're best off setting up a systemd service file for inputattach (see also this post). In that case, your udev rule becomes
SUBSYSTEM=="tty|pnp", KERNEL=="ttyS4",  \
      RUN+="/sbin/modprobe elo", \
      TAG+="systemd", ENV{SYSTEMD_WANTS}+="elo-inputattach@%k.service"
So we tag the device for systemd and tell it to start a servirce. The %k gets
replaced with the ttySx device. The matching systemd unit file looks like
this:
$> cat /etc/systemd/system/elo-inputattach@.service
[Unit]
Description=inputattach for elo serial devices

[Service]
Type=simple
ExecStart=/usr/bin/inputattach -elo /dev/%I
Once both of these are in place, a reboot will initialise inputattach, and the device is available as kernel device.
X.Org configuration
X requires the udev properties ID_INPUT and one of ID_INPUT_MOUSE, ID_INPUT_TABLET, etc. to to recognise an input device. Each of those triggers the respective MatchIsPointer, MatchIsTablet, etc. directive in the xorg.conf.d snippets. On modern systems, the udev properties should be assigned automatically [2]. If that doesn't happen on your box, you can modify the above udev rules to add it manually:
$> cat /lib/udev/rules.d/99-elographics.rules
ACTION=="add|change", SUBSYSTEM=="tty|pnp", KERNEL=="ttyS4", \
        RUN+="/sbin/modprobe elo", \
        RUN+="/sbin/inputattach -elo /dev/%k --daemon", \
        ENV{ID_INPUT}="1", ENV{ID_INPUT_TOUCHSCREEN}="1"
Once this is done, the X server will pick up the device, and the default configuration [3] will assign the evdev driver to it. Restart X, and you're done. If you require additional options, set up an xorg.conf.d snippet. There you can add any options found in evdev(4):
$> cat /etc/X11/xorg.conf.d/99-elographics.conf
Section "InputClass"
  Identifier "elographics config"
  MatchProduct "Elo Serial TouchScreen"
  Option "EmulateThirdButton" "on"
EndSection
This snippet will match any device with the product name containing "Elo Serial Touchscreen" and enable the right button emulation feature in the evdev driver. If you are unsure about the name of your device, check /proc/bus/input/devices once inputattach is running.
X.Org configuration on Red Hat Enterprise Linux (RHEL) 6.x
This section applies to derivatives as well, e.g. CentOS 6. On RHEL 6.x, we use HAL as a configuration backend. So you will need an fdi snippet to match the device up with the driver. The snippet below is the one Tom ended up using, and it also shows the Calibration option being merged.
$> cat /etc/hal/fdi/policy/10-elographics.fdi
<?xml version="1.0" encoding="ISO-8859-1"?>
<deviceinfo version="0.2">
  <device>
    <match key="info.category" contains="input">
      <match key="info.product" contains="Elo Serial TouchScreen">
        <merge key="input.x11_driver" type="string">evdev</merge>
        <!-- next line is equivalent to an xorg.conf.d statement of
                Option "Calibration "40 4000 40 4000" -->
        <merge key="input.x11_options.calibration" type="string">40 4000
40 4000</merge>
      </match>
    </match>
  </device>
</deviceinfo>
Note the "match key" statement. Apparently, this particular device does not set "input.touchscreen", so we match on just "input" instead. Not too big a deal, since we then also match on the product name.
Once this file is in place, restart haldaemon and check with lshal that the right options are assigned. Then restart X and the device should work.
Good luck!
Many thanks to Tias and Tom for proof-reading this article multiple times.
[1] for example, evdev supports dynamic recalibration with the xinput_calibrator tool
[2] check the output of udevadm info --export-db
[3] your distribution should ship /usr/share/X11/xorg.conf.d/10-evdev.conf which assigns evdev to MatchIsTablet.
[edit 22 Feb 13: fix typo in MatchProduct name]
Thursday, June 21, 2012
XKB SlowKeys
XKB has an accessibility feature called SlowKeys. Once enabled, a key must be pressed longer than a certain timeout (default: 300ms) to register as key event. Why? From XkbGetSlowKeysDelay(3):
The server has a built-in key sequence that if either shift key is held for 8 seconds, SlowKeys are enabled. Likewise, another 8s press of either shift key disables them again. This may accidentally happen when playing games or scrolling through long documents.
The server keeps two bitflags around. One for "accessibility features enabled" and one for "slow keys enabled". If the former is set, the key sequence above will activate slow keys (and thus toggle the second bit).
In GNOME3, you can find these options in the Universal Access panel of your System Settings:

If "Turn on accessibility features from the keyboard" is checked, holding shift will enable/disable SlowKeys. If the SlowKeys toggle is on, SlowKeys are always on.
The equivalent gsettings command (to uncheck the checkbox) is:
GNOME3 should also warn about SlowKeys being enabled but due to Bug 668213 it stopped doing so in January. Affected is GNOME 3.2+ but we're working on a fix to this.
Some users may accidentally bump keys while moving a hand or typing stick toward the key they want. Usually, the keys that are accidentally bumped are just hit for a very short period of time. The SlowKeys control helps filter these accidental bumps by telling the server to wait a specified period, called the SlowKeys acceptance delay, before delivering key events. If the key is released before this period elapses, no key events are generated.This is a useful feature for those that need it, but quite disturbing when it gets enabled without the user noticing. And that can happen and it then appears as if the keyboard drivers are broken (after all, a restart of the X server reverts it). So here's a what you have to do to avoid this issue:
The server has a built-in key sequence that if either shift key is held for 8 seconds, SlowKeys are enabled. Likewise, another 8s press of either shift key disables them again. This may accidentally happen when playing games or scrolling through long documents.
The server keeps two bitflags around. One for "accessibility features enabled" and one for "slow keys enabled". If the former is set, the key sequence above will activate slow keys (and thus toggle the second bit).
In GNOME3, you can find these options in the Universal Access panel of your System Settings:
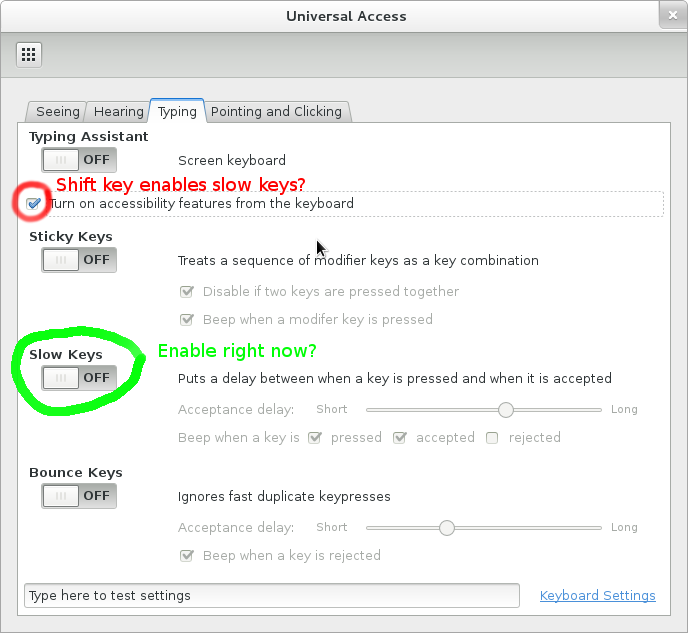
If "Turn on accessibility features from the keyboard" is checked, holding shift will enable/disable SlowKeys. If the SlowKeys toggle is on, SlowKeys are always on.
The equivalent gsettings command (to uncheck the checkbox) is:
gsettings set org.gnome.desktop.a11y.keyboard enable falseI recommend that if you do not need this feature, uncheck the checkbox to avoid nasty surprises. I've also added a patch to the X server to put a warning in the log if SlowKeys is enabled via the shift key. This should make future triaging a bit easier. If you see the message
(II) XKB SlowKeys are now enabled. Hold shift to disable.in your log, you're likely better off disabling the checkbox. This patch will be in server 1.13 and server 1.12.3.
GNOME3 should also warn about SlowKeys being enabled but due to Bug 668213 it stopped doing so in January. Affected is GNOME 3.2+ but we're working on a fix to this.
_XkbErrCode2 macro explanation
While debugging some keyboard layout issues, I got this error:
And that's when it struck me: they didn't have any meaning. 0x16 is literally 0x16, the 22nd error code statement in this function. And, in this case also the 23rd since it is used twice. Of course, if one ever de-duplicate some of the XKB code the numbering is out. And I couldn't find a place where this is documented, so who knows how much damage we did to that approach without noticing.
Anyway, if you ever have to google for _XkbErrCode2, I'm hoping this post now comes up and explains the despair you're about to encounter.
X Error of failed request:  BadValue (integer parameter out of range for operation)
  Major opcode of failed request:  145 (XKEYBOARD)
  Minor opcode of failed request:  9 (XkbSetMap)
  Value in failed request:  0x163f0005
  Serial number of failed request:  116
  Current serial number in output stream:  122
X Errors are supposed to be useful to the client, usually denoting some error code (e.g. BadValue) and, if possible, the value that triggered it. After reading the code, I found the _XkbErrCode2 family of macros that expand to fill in the error code.
#define _XkbErrCode2(a,b) \
   ((XID)((((unsigned int)(a))<<24)|((b)&0xffffff)))
#define _XkbErrCode3(a,b,c) \
   _XkbErrCode2(a,(((unsigned int)(b))<<16)|(c))
#define _XkbErrCode4(a,b,c,d) \
   _XkbErrCode3(a,b,((((unsigned int)(c))<<8)|(d)))
Easy enough to decompose on the client though there's no indication of which decomposed representation is the correct one.
xkb/xkb.c:1742 _XkbErrCode3(0x16, i + req->firstKeySym, wire->width);
xkb/xkb.c:1749 _XkbErrCode4(0x16, i + req->firstKeySym, wire->nSyms, w);
That's when I started wondering what the 0x16 could mean - could it possibly be _XkbErrBadValue (from xkbfile.h) Bit generic, but possible. But why isn't it using the define? Looking at other _XkbErrCode calls, some were somewhat close but others were miles out. XkbBell returning _XkbErrMissingVMods? That didn't make sense.
And that's when it struck me: they didn't have any meaning. 0x16 is literally 0x16, the 22nd error code statement in this function. And, in this case also the 23rd since it is used twice. Of course, if one ever de-duplicate some of the XKB code the numbering is out. And I couldn't find a place where this is documented, so who knows how much damage we did to that approach without noticing.
Anyway, if you ever have to google for _XkbErrCode2, I'm hoping this post now comes up and explains the despair you're about to encounter.
Subscribe to:
Posts (Atom)