Thursday, June 21, 2012

XKB SlowKeys

XKB has an accessibility feature called SlowKeys. Once enabled, a key must be pressed longer than a certain timeout (default: 300ms) to register as key event. Why? From XkbGetSlowKeysDelay(3):
Some users may accidentally bump keys while moving a hand or typing stick toward the key they want. Usually, the keys that are accidentally bumped are just hit for a very short period of time. The SlowKeys control helps filter these accidental bumps by telling the server to wait a specified period, called the SlowKeys acceptance delay, before delivering key events. If the key is released before this period elapses, no key events are generated.
This is a useful feature for those that need it, but quite disturbing when it gets enabled without the user noticing. And that can happen and it then appears as if the keyboard drivers are broken (after all, a restart of the X server reverts it). So here's a what you have to do to avoid this issue:

The server has a built-in key sequence that if either shift key is held for 8 seconds, SlowKeys are enabled. Likewise, another 8s press of either shift key disables them again. This may accidentally happen when playing games or scrolling through long documents.

The server keeps two bitflags around. One for "accessibility features enabled" and one for "slow keys enabled". If the former is set, the key sequence above will activate slow keys (and thus toggle the second bit).

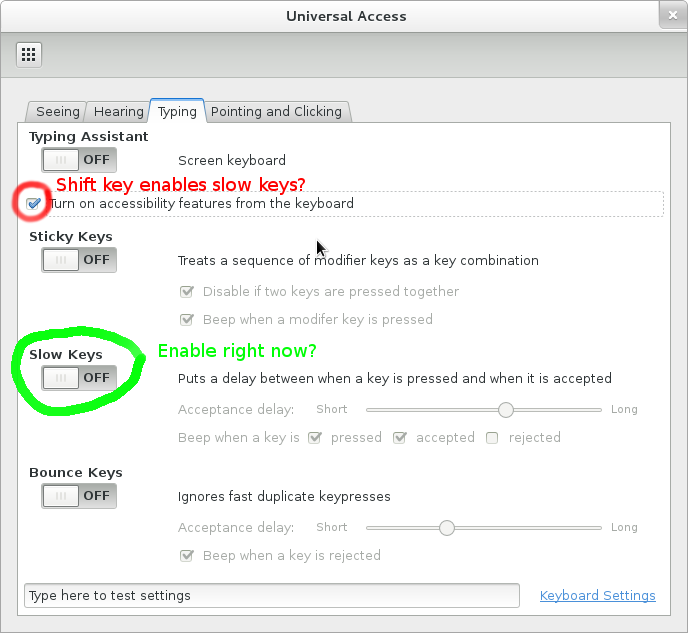
In GNOME3, you can find these options in the Universal Access panel of your System Settings:


If "Turn on accessibility features from the keyboard" is checked, holding shift will enable/disable SlowKeys. If the SlowKeys toggle is on, SlowKeys are always on.

The equivalent gsettings command (to uncheck the checkbox) is:
gsettings set org.gnome.desktop.a11y.keyboard enable false
 I recommend that if you do not need this feature, uncheck the checkbox to avoid nasty surprises. I've also added a patch to the X server to put a warning in the log if SlowKeys is enabled via the shift key. This should make future triaging a bit easier. If you see the message
(II) XKB SlowKeys are now enabled. Hold shift to disable.
in your log, you're likely better off disabling the checkbox. This patch will be in server 1.13 and server 1.12.3.
 
GNOME3 should also warn about SlowKeys being enabled but due to Bug 668213 it stopped doing so in January. Affected is GNOME 3.2+ but we're working on a fix to this.

_XkbErrCode2 macro explanation

While debugging some keyboard layout issues, I got this error:
X Error of failed request:  BadValue (integer parameter out of range for operation)
  Major opcode of failed request:  145 (XKEYBOARD)
  Minor opcode of failed request:  9 (XkbSetMap)
  Value in failed request:  0x163f0005
  Serial number of failed request:  116
  Current serial number in output stream:  122
X Errors are supposed to be useful to the client, usually denoting some error code (e.g. BadValue) and, if possible, the value that triggered it. After reading the code, I found the _XkbErrCode2 family of macros that expand to fill in the error code.
#define _XkbErrCode2(a,b) \
   ((XID)((((unsigned int)(a))<<24)|((b)&0xffffff)))
#define _XkbErrCode3(a,b,c) \
   _XkbErrCode2(a,(((unsigned int)(b))<<16)|(c))
#define _XkbErrCode4(a,b,c,d) \
   _XkbErrCode3(a,b,((((unsigned int)(c))<<8)|(d)))
Easy enough to decompose on the client though there's no indication of which decomposed representation is the correct one.
xkb/xkb.c:1742 _XkbErrCode3(0x16, i + req->firstKeySym, wire->width);
xkb/xkb.c:1749 _XkbErrCode4(0x16, i + req->firstKeySym, wire->nSyms, w);
That's when I started wondering what the 0x16 could mean - could it possibly be _XkbErrBadValue (from xkbfile.h) Bit generic, but possible. But why isn't it using the define? Looking at other _XkbErrCode calls, some were somewhat close but others were miles out. XkbBell returning _XkbErrMissingVMods? That didn't make sense.

And that's when it struck me: they didn't have any meaning. 0x16 is literally 0x16, the 22nd error code statement in this function. And, in this case also the 23rd since it is used twice. Of course, if one ever de-duplicate some of the XKB code the numbering is out. And I couldn't find a place where this is documented, so who knows how much damage we did to that approach without noticing.

Anyway, if you ever have to google for _XkbErrCode2, I'm hoping this post now comes up and explains the despair you're about to encounter.

Tuesday, June 12, 2012

XI 2.1 protocol design issues

When XI 2.1 smooth scrolling was released, we were glad to finally have a way for fluid scrolling events. Unfortunately, two design issues have since been discovered that make it harder for applications than necessary. Mea culpa, I apologise, these are things that we should have caught in the review process.

Scrolling may overflow the axis range

Scrolling events are now posted through axes marked as scrolling axes. This means they're limited to the 32.32 fixed point value range that valuators can take. That range matters because despite scrolling being relative, coordinates in XIDeviceEvents must always be absolute values. Scrolling down is more common than scrolling up, so the axis will slowly accumulate until it reaches the maximum range. We have to reset them to 0 once we reach INT_MAX to avoid overflow so at some point you may see a scrolling event that jumps from something that's close to 232 to 0. You can at this point assume that this was not a valid scroll event. This is a rather theoretical case, overflowing this range requires a lot of scrolling, even on touchpads with a higher scroll increment.

The first scroll event has no usable scroll information

This is a more significant issue. The smooth scrolling information is part of the valuator data, but axis data is only sent in some events, and then only to some clients. Once a pointer leaves the window, the original client loses track of what happens to the valuators. Once the pointer re-enters the client's window it will receive the new axis value once more scrolling happens. That value is an absolute value but clients need the delta between it and the previous scroll event. That information is only available once the second event is sent to the client.

For example, the axis data may be 3000 when the pointer leaves the window. Then the pointer re-enters the window and the first scroll event sends has a value of 5500. Since we don't know how much the axis increased elsewhere, we cannot act on this scroll event, we have to wait for the next one to calculate a delta.

I confirmed with Carlos that this is indeed what GTK does: reset the scroll valuators on enter and then track the valuators for future events.

Tuesday, June 5, 2012

git branch-info

I have too many branches. And sometimes I forgot which one is which. So yesterday I sat down and wrote a git alias to tell me:
branch-info = "!sh -c 'git branch --list --no-color | \
    sed -e \"s/*/ /\" | \
    while read branch; do \
    git log -1 --format=format:\"%Cred$branch:%Cblue %s %Cgreen%h%Creset (%ar)\" $branch; \
    done'"
Gives me a nice output like this:
:: whot@yabbi:~/xorg/xserver (for-keith)> git branch-info
dtrace-input-abi:  dix: add dtrace probes to input API  c0b0a9b (3 months ago)
extmod-changes:  DRI2: Remove prototype for DRI2DestroyDrawable  8ba2980 (11 months ago)
fedora-17-branch:  os: make timers signal-safe 7089841 (6 weeks ago)
master:  Xext: include dix-config.h 594b4a4(12 days ago)
mt-devel: Switch to new listener handling for touch events 3ee84fc (6 months ago)
mt-devel2: dix: conditionally update the cursor sprite 9edb3fd(6 months ago)
multitouch: blah 8ecec2e(4 months ago)
...
Or, the same thing aligned in columns, though without colours (column doesn't parse the escape sequences for colors so the columns are misaligned).
branch-info = "!sh -c 'git branch --list --no-color | \
    sed -e \"s/*/ /\" | \
    while read branch; do \
    git log -1 --format=format:\"$branch:|%s|%h|%ar\n\" $branch; done | \
    column -t -s\"|\"'"

pkg-config and empty CFLAGS

I ran into this a few days ago and it took me a while to find. One of the gnome modules failed to build with an error of "cannot find <gtk/gtk.h>". At first I thought it was a Makefile.am/configure.ac error but it appears the issue sits deeper. Cause of the problem was a stale gtk installation, but finding that was tricky. The configure.ac file contains essentially
PKG_CHECK_MODULES(GTK, gtk+-2.0)
AC_SUBST(GTK_CFLAGS)
AC_SUBST(GTK_LIBS)
Turns out that PKG_CHECK_MODULES in configure.ac gets translated to
pkg-config --exists --print-errors gtk+-2.0
This returns 0 (success) on my machine - the gtk+-2.0.pc file is there. However, to get the CFLAGS, configure runs a different command and that returned an error:
$> pkg-config --cflags gtk+-2.0
Package libpng12 was not found in the pkg-config search path.
Perhaps you should add the directory containing `libpng12.pc'
to the PKG_CONFIG_PATH environment variable
Package 'libpng12', required by 'GdkPixbuf', not found
Alas, this error isn't shown anywhere and it doesn't end up in the log either. What does happen though is that GTK_CFLAGS gets replaced with an empty string, causing the build error above. Once I installed the required libpng everything works fine. But if you ever run into issues where the CFLAGS aren't quite what they should be, check the pkg-config commands for success.

[Update Jun 07 2012]
As pointed out in the comments, looks like we're looking at https://bugs.freedesktop.org/show_bug.cgi?id=4738 and https://bugs.freedesktop.org/show_bug.cgi?id=43149 here.

Friday, May 18, 2012

Home-made 4WD rooftop awning

This article describes how to build your own rooftop awning. I recommend that if you do want an awning, purchase one from a store. They have come down in price considerably since I built mine. If you do go ahead, make sure to check with your local transportation authority and check whether such a device is legal in your country/state.

Anyway, let's start. A while ago I wanted a rooftop awning but I didn't want to pay that much money. In Australia, these awnings go for several hundred dollars, and the small ones are indeed quite small. So I built my own, instructions are below. This is how it looks like:


Sometimes it's a tough life...

The ingredients are:
  • tarp with metal eyelets. IIRC mine is 2.4 x 3.0m (similar one)
  • 3m 25x25mm aluminium square tube (or width of tarp otherwise)
  • Two plastic caps for the square tube
  • Four 1.5 inch 3/8 bolts + nuts + washers
  • Four 2 inch 3/8 bolts + nuts + washers
  • Four poles, one crossbar, ropes, pegs
  • Wide (~5cm) velcro, 1 m is sufficient (makes 3 strips)

Most of the stuff I got from Bunnings, the poles from the camping store and the velcro from a textile store next to the BCF at Cannon Hill.

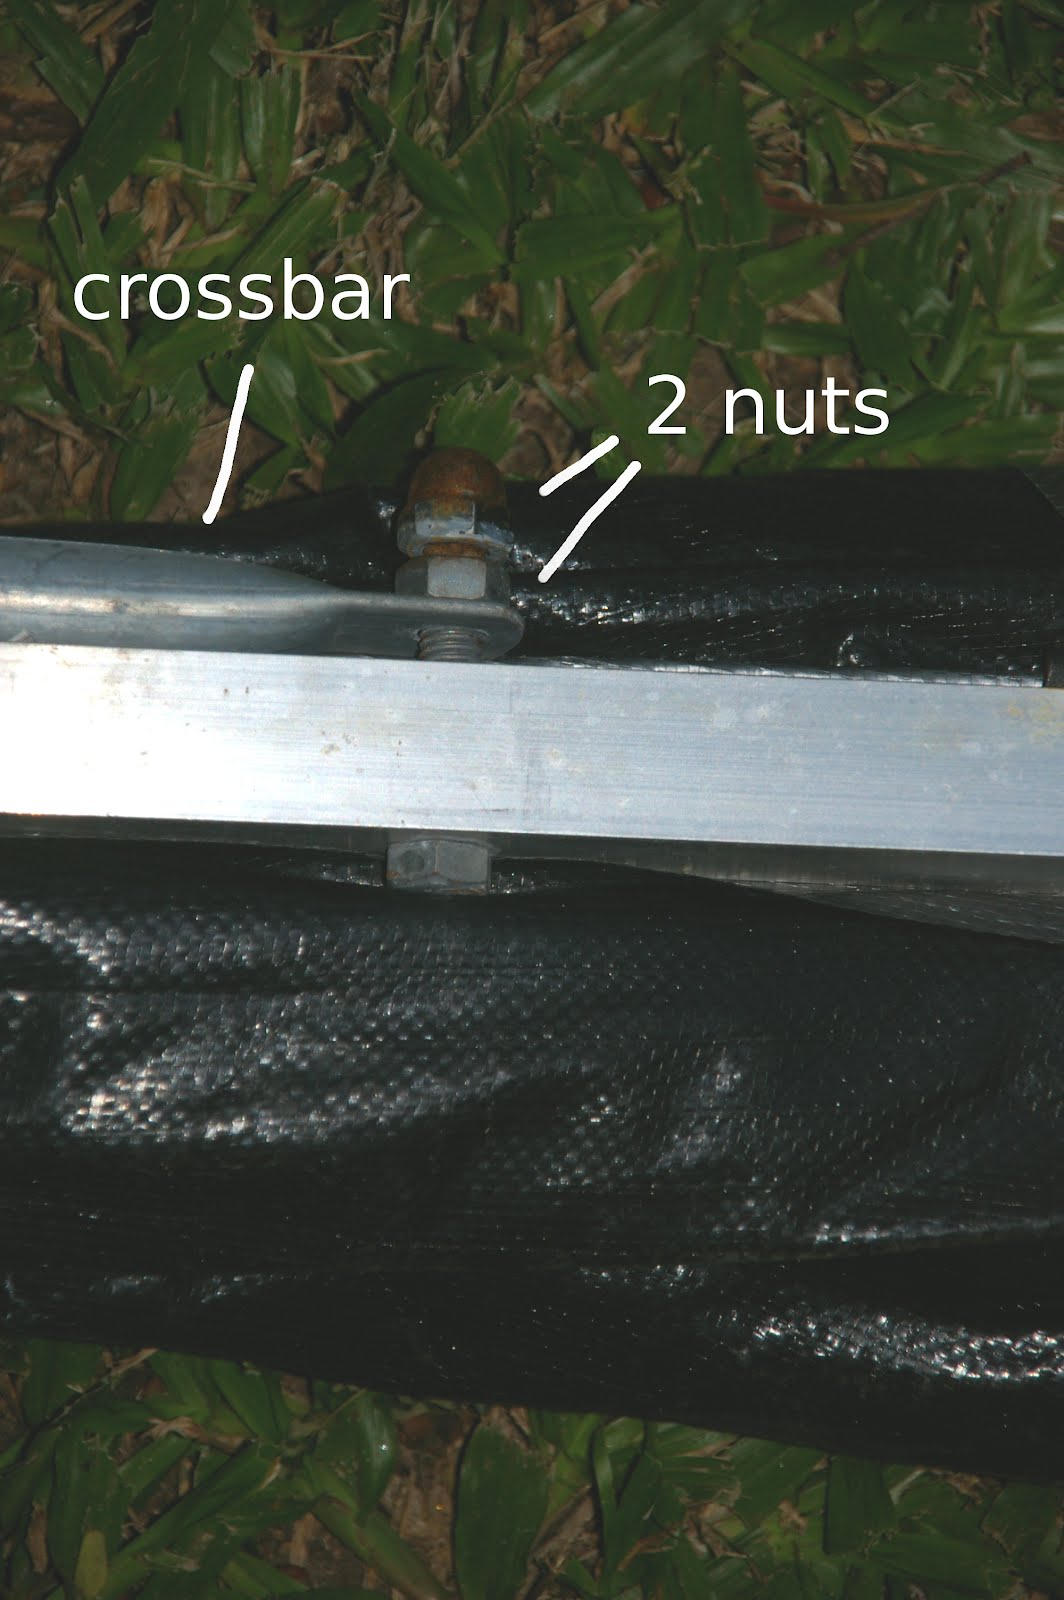
The basic design is simple. The tarp is held onto the square tube by a bunch of vertical bolts - one per tarp eyelet. The crossbar, which is too long for my tray, is held in place by two horizontal bolts, on the inside (towards the car). The tarp is folded in half, then rolled up and held in place by three strips of velcro.

Tarp when rolled up for transport.

I have Rhino Rack Aero bars and the bolts I got had a head exactly the size of the groove. So I don't need mountings, I simply push the screw into the groove, then sit the awning on it and tighten the nut up the top. And, second time lucky, the eyelets are the distance of my roof racks, so I don't have to do anything there either.


The bolt fits exactly into the groove - lucky me :)
Obscured by the rolled-up tarp is the top end of the bolt - simply a washer and a nut.

Assembly instructions


Drill a hole a few cm in from one ond of the square tube. Now take a bolt and nut, screw the tarp's corner to the tube. Stretch it to the other end, drill another hole, bolt, nut, done. The tarp should be tightly stretched. Now mark each eyelets in the middle for more holes. Take the tarp off, drill the remaining holes, then saw the excess square tube off.

Bolt shown from the side

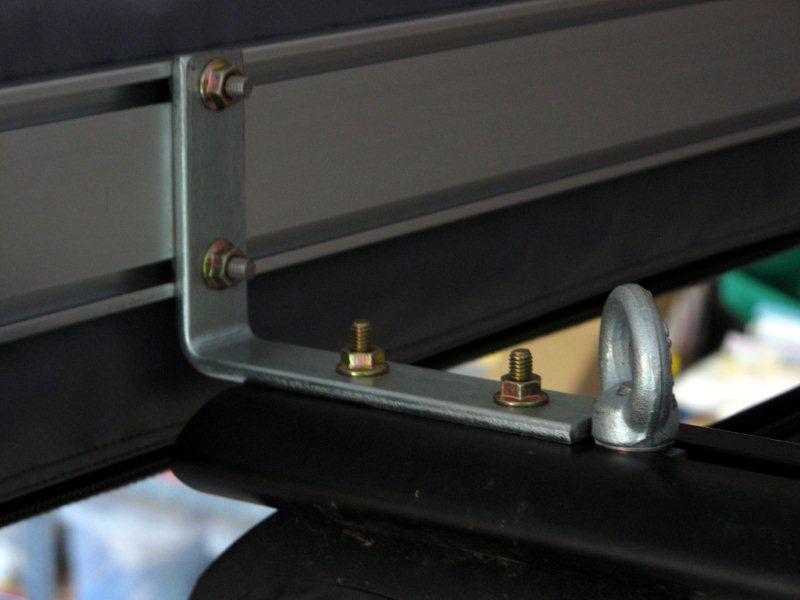
As said above, my roof racks are exactly the distance of the eyelets, so I don't need extra mountings. The professional awnings have an L-shaped attachment that goes into the roof racks and the awning then hangs off the side. This photo shows the attachment, the same should be possible on this home-made model.


The final bit are two horizontal drillings through the tube. They are for mounting the crossbar next to the tube. I transport the four poles, the ropes and the pegs in the tray.

Crossbar mount. The bolt is horizontal when mounted.

The front bit of the rolled-up awning, taken from the other side of the car, showing the crossbar mount.

Setting it up is simple enough, though it does require 2 people. It takes a few minutes to set up, a few minutes to pack up again. If the tarp gives up, I can (hopefully) buy another one and replace it.

Costs for me was just over AUD 100, including the crossbar and the poles. If you already have those, you're obviously able to build it for much less.

Side notes

As I have the handyman's knowledge of a five-year-old, I did a few things wrong. First, Bunnings sells bolts in imperial and metric. Had I known that, I'd have bought metric screws. I ended up just getting the first set that matched the size I needed. The metric section was a few metres further down the aisle.

The first set of (round capped) nuts wasn't galvanised and started rusting (you can see it in the photos). Haven't been able to find galvanised ones for the imperial bolts, so I've since replaced them with galvanised normal nuts.

Pros and Cons

  • It's freaking awesome! Having a shady spot next to the car wherever you roll up is great!
  • The awning is big. Not much of an issue once it's mounted but it's pretty unwieldy in the garage.
  • The surface area covered is perfect for two people and a table, so no issues there.
  • The awning is not free-standing. I believe the commercial models are, but this one needs to be pegged down. Which means that moving the car once it's set up is a no-go, you have to tear it down.
  • The way I roll it results in rain collecting in the rolled-up tarp. I could roll it the other way, but that's a bit awkward. No big issue though, except after a good rain when you break at the first set of lights, a few litres of water will run down your windscreen :)
  • I can't yet claim how it will hold up in a typical Queensland wind or thunderstorm. I think it will be alright, but so far I've only had it up during light winds and light rain.
Thursday, May 10, 2012

Testing X servers from git

Every so-often I get asked the question of how to test the X server (or drivers) from git. The setup I have is quite simple: I have a full tree in /opt/xorg, next to the system-installed binaries in /usr. A symlink and some environment variables allow me to switch between git versions of the server and clients and the system-installed ones.

Installing the tree

Getting that setup is quite easy these days:
mkdir -p xorg/util
git clone git://anongit.freedesktop.org/git/xorg/util/modular xorg/util/modular
cd xorg
./util/modular/build.sh --clone --autoresume built.modules /opt/xorg
That takes a while but if any component fails to build (usually due to missing dependencies) just re-run the last command. The built.modules file contains all successfully built modules and the script will simply continue from the last component. Despite the name, build.sh will also install each component into the specified prefix.

You get everything here, including a shiny new copy of xeyes. Yes, what you always wanted, I know

Note that build.sh is just a shell script, so you can make changes to it. Disable the parts you don't want (fonts, for example) by commenting them out. Or alternatively, generate a list of all modules, remove the ones you don't want or need and build with that set only:

./util/modular/build.sh -L > module_list
vim module_list # you can skip fonts, apps (except xkbcomp) and exotic drivers
./util/modular/build.sh --clone --autoresume built.modules --modfile module_list /opt/xorg

Either way, you end up with /opt/xorg/bin/Xorg, the X server binary. I just move my system-installed and then symlink the new one.

sudo mv /usr/bin/Xorg /usr/bin/Xorg_old
sudo ln -s /opt/xorg/bin/Xorg /usr/bin/Xorg
Next time when gdm starts the server, it'll start the one from git. You can now update modules from git one-by-one as you need to and just run make install in all of them. Alternatively, running the build.sh script again without the --clone parameter will simply git pull in each module.

Setting up the environment

What I then define is a few environment variables. In my .zshrc I have
alias mpx=". $HOME/.exportrc.xorg"
and that file contains
export PKG_CONFIG_PATH=/opt/xorg/lib/pkgconfig:/opt/xorg/share/pkgconfig
export LD_LIBRARY_PATH=/opt/xorg/lib/
export PATH=/opt/xorg/bin:$PATH
export ACLOCAL="aclocal -I /opt/xorg/share/aclocal"
export MANPATH=/opt/xorg/share/man/
So running "mpx" will start git versions of the clients, link clients against git versions of the libraries, or build against git versions of the protocol.

Why this setup?

The biggest advantage of this setup is simple: the system install doesn't get touched at all and if the git X server breaks changing the symlink back to /usr/bin/Xorg_old gives me a working X again. And it's equally quick to test Fedora rpms, just flick the symlink back and restart the server. I have similar trees for gnome, wayland, and a few other large projects.

It also makes it simple to test if a specific bug is a distribution bug or an upstream bug. Install the matching X server branch instead of master and with a bit of symlink flicking you can check if the bug reproduces in both. For example, only a few weeks ago I noticed that xinput got BadAtom errors when run from /usr/bin but not when run from /opt/xorg/bin. Turns out it was a thing fixed in the upstream libXi but not backported to Fedora yet.

The drawback of this setup is that whenever the xorg-x11-server-Xorg module is updated, I need to move and symlink again. That could be automated with a script but so far I've just been too lazy to do it.

[Update 11.05.12: typo and minor fixes, explain build.sh -L]